The Best Makeup Organization System Every Woman Must Know
Getting ready in the morning is stressful, even more so when you can’t find your favourite makeup or accessory. To make your mornings less hectic, we’ve gathered 9 awesome organization tips for your vanity!
How To Categorise Makeup
1. Keep Your Daily Makeup Accessible

Keep your everyday makeup front and centre so that you can easily reach for it every morning before work. It prevents you from rummaging through your drawers to find the products you need and messing up the entire organization.
Tip: Place makeup in the order of application on your vanity desk based on your dominant hand.
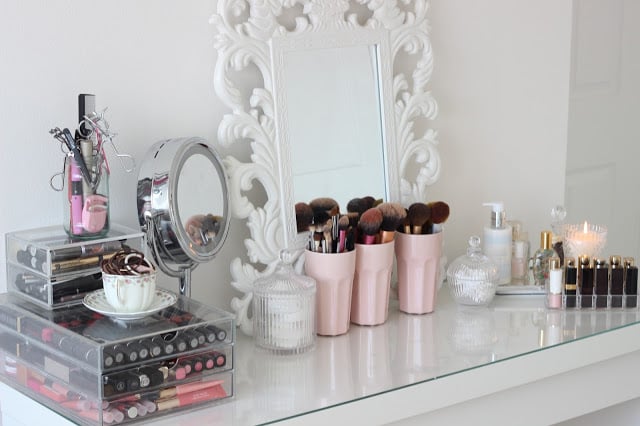
2. Sort Your Makeup By Type
Image source: That Geeky Girlfriend
For the remaining makeup products, categorise it based on the type of makeup. For example, bronzers, blusher and eyeshadow palettes. This makes it easier for you to find the products you want at any given time!
You can also have additional categories such as new makeup. If you’re someone who’s always looking out for new products to try out, you can have a designated box on your vanity, especially for them so you’ll remember to use it.
Tip: For new makeup products, test it out and see if it works for you. If it doesn’t, consider giving it to someone else who might benefit from the product. Don’t keep it hoping that you’ll use it one day.
3. Rotate Out Old Makeup
Every 6 months, take a look at your makeup collection and remove those that you don’t use from your collection. If your unused makeup products are in a good condition, keep them in a box. Whenever you have family or friends coming over, you can let them choose which products they’d like to have!
For expired makeup, immediately dispose of it. Here’s a general guideline on how long you can keep a makeup item:
- Foundation & concealer: 12 to 18 months
- Powder & cream products: 12 to 18 months
- Mascara & liquid eyeliner: 3 to 6 months
- Lipstick: 18 to 24 months
- Lip gloss: 12 to 18 months
With that being said, do take note of the Period After Opening (PAO) symbol on the makeup packaging – it indicates how long you can use the product after opening it. Keep these 3 tips in mind when checking for expired makeup!
Note: Makeup can get messy, so remember to wipe down the makeup packaging and makeup containers before keeping it away.
How To Stop Over-Buying Makeup
When you have too many makeup products, you will forget about the older ones and before you know it, it’s expired. Here are some tips on how you avoid wasting too much money on unused makeup:
- Do mindful purchases: Every time a new product is released, instead of impulsively buying it, take the time to think about whether you really want this product. If your excitement about it dies after a while, it’s a sign that you shouldn’t buy it.
- Stick to your makeup routine: Overpurchasing and wastage happen when you’re trying to experiment with different makeup looks. Figure out the makeup products that fit you best and stick with it.
- Create a ‘no-buy’ challenge: Don’t purchase any makeup products within a certain time frame. You’ll realise how much money you can save and it’ll also allow you to use the products you already have!
How To Organize Makeup
4. Divide & Conquer Your Drawers

For makeup products that you don’t reach for as often, keep them away from the vanity top as it will just create clutter. The vanity top is meant for items that you’ll be using on the daily basis.
Instead, keep them in your vanity drawers or buy external drawer storage. Utilise drawer inserts or small boxes to ensure that your makeup stays neat and organized.
Group like items together and store them in a compartment. Whenever you need something, you’ll immediately know where to find it.

Psst! Check out our Cosmetics Organizers to keep your vanity neat and tidy!
5. Utilise Height Space
Ft. Anti-Dust Modular Makeup & Vanity Organizer
If you’re tight on space, go vertical with your storage! Use a multi-tiered rotating makeup organizer to store all your frequently used makeup in 1 spot. It makes it easier for you to find your products in the morning when you need it.
6. Add A Makeup Cart

Create additional storage by sliding a storage trolley next to your vanity. Separate your different makeup categories – face, eyes, lips – into different tiers and label them!
This cart also allows you to transport it anywhere around your house to do your makeup if you don’t have a vanity table.

7. Separate Face & Eye Brushes

Your makeup brushes are also part of your makeup collection, so be sure to keep them organized!
To save you time from finding that small eyeliner brush, keep your face and eye brushes in separate holders. Make sure to keep your brushes upright so that it remains hygienic and long-lasting.
You can store your brushes in old mugs or candle holders and fill it up with rice or beans to keep them upright.
If your brush holder has a lid or cover, it’s even better as it will prevent dust from settling onto your brushes.
Tip: Wash your makeup brushes every week to prevent bacteria build-up that could cause acne. A clean brush also ensures that your makeup is applied smoothly onto your face! 16
8. Create A Lipstick Swatch Chart

Image source: Sauve Women
If you have an abundant number of lipsticks, this is the perfect DIY project for you to try out! All you need is a piece of paper or canvas, a black marker and your lipstick collection. Simply swatch your lipstick on the paper and label the lipstick brand and shade.
Not only does this DIY help you keep track of what coloured lipsticks you have in your collection, but it also doubles as wall art for your vanity area.
If you aren’t a fan of wall art, you can make a smaller version of it in a notebook and keep it on your vanity top.
Tip: To keep track of your makeup budget, you can consider adding a column for the price of your lipstick. You can also have a column for the date of purchase/opened so that it’s easier to keep track of the expiry date!

Image source: Safiya Nygaard
Alternatively, you could paste a paper sticker label on top of your lipstick cap and swatch your lipstick colour for easy identification.
9. Personalise Your Space

Image source: Lynne G. Caine
After organizing all your makeup products, don’t forget to add some finishing touches at the perimeters of your desk! Add a plant and/or a scent diffuser to personalise your space. This will encourage you to always maintain your vanity in this clean state.
For convenience, add a makeup mirror on your vanity too, place it at your non-dominant hand so that you can easily reach out for your makeup products.
When all your items have a home of its own, organization isn’t too taxing! Just remember to place your products at its designated spot after each use. Now, get on your feet and start organizing your vanity for a hectic-free morning.
Let us know in the comments which tip is your favourite and if you have any that you’d like to share!